|
Frequently Asked Questions about PDMarq Audio Recorder
Q.1) How to make a recording?
Q.2) Why can't I hear the recording?
Q.3) How to schedule a radio recording with Windows Task Scheduler?
Q.4) How to schedule an Internet radio stream recording with Task Scheduler?
Q.5) How to eliminate noise, loud pops and crackles in the recording?
Q.6) How to find an Internet audio stream address in Windows Media player or RealPlayer or QuickTime?
Q.7) How to record two streams simultaneously?
Q.8) How to plug-in the Blade mp3 encoder?
Other questions? Please see http://pdmarq.com/support.html or email: support@pdmarq.com
Q.1 How to make a recording?
Step 1) Press the Recording Source button.
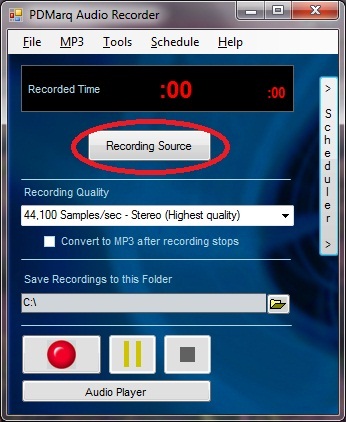
You should now see the Windows Sound Control with the Recording tab already selected for you. This is where you will choose the source that you want to record from. Depending on your sound card, you may see different choices than what is shown below. If you want to record Internet audio, then make sure Stereo Mix is ENABLED and SET AS DEFAULT DEVICE. Some sound cards don't have Stereo Mix option, it may instead be worded differently such as WAV Out, What U Hear, etc. If you don't see Stereo Mix or WAV Out or WHAT U Hear, then keep reading, otherwise go to STEP 2.
If you want to record Internet audio and you don't see the choices mentioned above, then right-click in an empty area of the Recording tab and you will see a menu giving you a choice to "Show Disabled Devices" and "Show Disconnected Devices". Select both of those choices. If you still don't see Stereo Mix or WAV Out at this point, then you will need to download/install an updated sound card driver from your sound card manufacturer's website.

Step 2) Select a Recording Quality - The higher the quality, the larger the file size will be and the better it will sound.
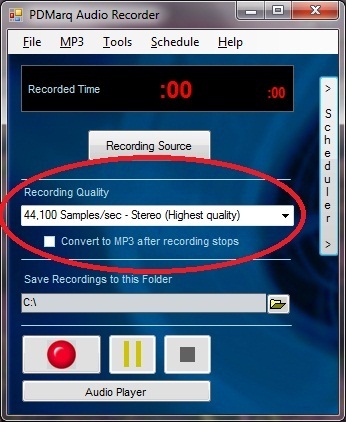
If you select a high recording quality, the MP3 conversion option will appear. You do not need to use this feature; it is for advanced users who want to reduce the file size of the recordings. PDMarq Audio Recorder enables users to plug-in the free Blade MP3 Encoder. Blade will only convert high quality WAV files. For all other WAV files, you can use other MP3 encoders.
Step 3) Select the folder you want to save your recordings to by pressing the "folder" button.

Step 4) If you are recording an Internet stream, then make sure you are playing the stream and that you can hear it. (This step DOES NOT involve the audio recorder. You do not need to enter a stream address in the recorder for this step.) If you can't hear the audio at this point, then do not proceed to the next step until you can hear audio. If you are recording from the line-in jack, then make sure you can hear the audio coming through your computer's speakers/headphones; if you do not hear anything, then you will record silence.
Step 5) Press the Record button to start the recording. When you are done recording, press the Stop button or use the Scheduler to stop the recording after a pre-determined number of minutes. When the recording stops, it will automatically be saved with a unique file name such as "Recording_<date and time>.wav". It will be saved in the folder you chose in Step 3. You can now play the recording using any media player or the built-in Audio Player or transfer it to a portable media player (Ipod, Zune, etc). You can also burn the recordings to a CD or DVD.
Q.2) Why can't I hear the recording?
If you can't hear anything when you playback the audio recording, it may be because you didn't select the correct recording source (microphone, line-in, stereo mix, etc) See Step 1. It also may be because no audio was playing during the recording process. Remember, if you are recording an Internet audio stream, you need to have it playiing in order to record it.
Another reason may be because your recording volume levels are set too low or muted. The Recording tab is where you can adjust the recording volume levels. Click the Recording Source button, now on the Recording tab, right-click on the recording source you are trying to record from and select PROPERTIES. Click the LEVELS tab and adjust the volume.
Q.3) How to schedule a radio recording (from an external radio) with Task Scheduler?
Q.4) How to schedule an Internet radio stream recording with Task Scheduler?
Scheduling a recording with Windows Task Scheduler
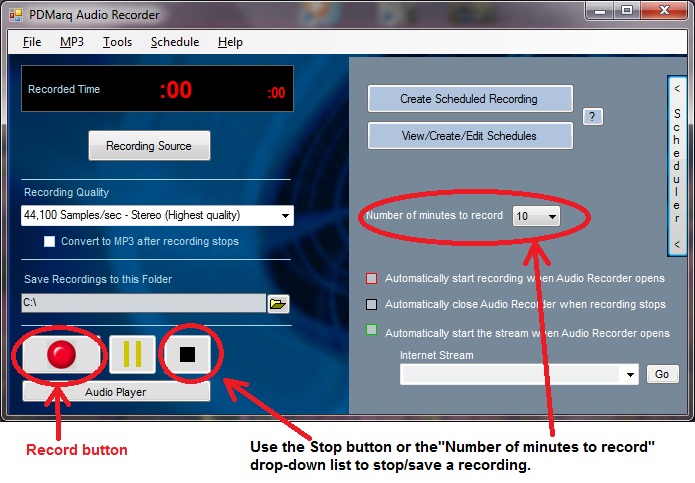
1. Click "Create Scheduled Recording" and enter a unique name for the scheduled task.

2. The Task Scheduler will open automatically after completing Step 1. Select "Task Scheduler Library" as shown in red circle on left. Then select the Task you created in Step 1. In this example, "RadioProgram1" is the newly created task. Now click PROPERTIES in the right column.

3. Select the Triggers tab. Then click the EDIT button.

4. This step is where you will choose if it is a daily, weekly, or monthly recording. This is also where you set the time the recording will start. Please keep in mind, you are only scheduling the start time of the recording; the length of the recording is set directly in PDMarq Audio Recorder.

5. If you put the computer into Sleep/Standby mode or Hibernate mode, you can wake the computer to make a recording. To do this, click the Conditions tab and put a check in the box "Wake the computer to run this task". Click OK, and then return to PDMarq Audio Recorder as shown in Step 6.

6. In this step, you will set the number of minutes to record from the drop down list. You also need to put a check in the red box "Automatically start recording...". If you are recording an Internet stream, then enter the Internet stream address and put a check in the green box. Finally, make sure the correct Recording Source is enabled and set as default by pressing the "Recording Source" button and choosing the appropriate source you are recording from. Stereo Mix or WAV Out are one of the sources you should see in the Recording Tab. If you don't then please make sure you have the most recent drivers for your sound card. If your sound card driver does not have those options, you can still record an Internet stream by connecting an audio cable from the headphone jack and loop it back into the mic jack or line-in jack. Then select Microphone or Line-in in the Recording Tab.

Q.5) How to eliminate noise, hiss, loud pops in the recording?
You may have to adjust the different volume levels of your radio as well as the volumes of the line-in, or microphone, or Stereo Mix and WAV volume settings of your sound card to get a perfect recording that has no hiss or pops or other distortions.
You can change different volume levels by accessing the Sound panel as shown in Q.1.Step1. Once you are in the REcording Tab, you can right-click on a recording source (example Stereo Mix) and select Properties. Within Properties, you will see the LEVELS tab where you can adjust the recording volume. Every sound card is different, you will need to experiment with what volume levels work best for your particular setup.
Q.6) How to find an Internet audio stream address in Windows Media player or RealPlayer or QuickTime?
The PDMarq Audio Recorder will automatically launch the default media player after you enter an Internet stream address and press "Go". The following list will help you locate Internet stream addresses for some of the more popular media players.
Windows Media Player
File > Properties
Select the File tab. The stream address will be located in the "Location" section.
RealPlayer
File > Clip Properties > View Clip Info
On the Clip Info tab, the address will appear on the "File Name" line.
QuickTime
Window > Show Movie Info
Stream address is located on the "Source" line.
Q.7) How to record two streams simultaneously?
-You need an audio player that allows you to move the volume to the left or right channel. Then a second audio player (playing a second stream) would need to have the volume set to the opposite channel as the first player.
-Start recording as you normally would and both streams will be captured.
-When you play back the recording, you will have two streams recorded in
one file. One stream on the right channel, one on the left channel. You just
need to move the volume balance to the channel that you want to hear.
Q.8) How to plug-in the Blade MP3 encoder?
-Do a search on the Internet for the file "bladeenc.exe" It is a free download and available at many sites. If it comes within a package download, you only need the one file called "bladeenc.exe"
-Save a copy of "bladeenc.exe" to the same folder that PDMarq Audio Recorder.exe is located or any where you can easily find it.
-On PDMarq Audio Recorder, at the top menu, click "MP3", then click "Install Blade MP3" , then browse for the "bladeenc.exe" file and press the "OPEN" button.
-You should now be able to use Blade MP3 encoder with the PDMarq Audio Recorder.
|